Consuming a headless Juce C++ audio library from a Xamarin CocosSharp game UI - Part 2
November 19, 2015 - Leo Olivers
(Sample code for this article is available at github.com/altalogix/CocosJuce)
In the previous post of this series we showed how to build a headless Juce audio library in C++. In this post we’ll take that library and consume it from a mobile C# UI, using Xamarin and the CocosSharp game framework.
[Update: The Android-related techniques in this article series work fine with Juce 3.3. However, Juce 4.x introduced a new Android startup activity which does not play well with a headless audio library. So far no workaround is known yet, but I’ll update these articles as soon as there is one.]
Xamarin solution structure
When you download the sample code (link above) you’ll find the Xamarin solution CocosJuceApp.sln in the CocosJuce/CocosJuceApp folder.
You can open this solution either with Xamarin Studio (Indie plan) or Visual Studio 2013 or higher (Business plan).
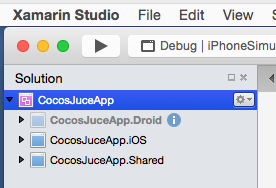
The solution contains three projects:
CocosJuceApp.Droid |
Android-specific code |
CocosJuceApp.iOS |
iOS-specific code |
CocosJuceApp.Shared |
Shared code |
The first two of these are platform-specific projects, for Android and iOS resp. These projects contain mainly start-up code needed for launching and initializing the app. The third project contains the actual UI code, written against a cross-platform UI API. This uses the CocosSharp game framework APIs, which are platform-independent.
Note that the shared code project is -not surprisingly- of the Shared Project type. This is a special project type that can be referenced from multiple other project types and is meant for code that should be reused by those other projects. It does not compile to its own assembly, but the shared code is instead “included” in any classic project that references the shared project.
It should not be confused with a Portable Common Library (PCL) project type. PCL projects
often play a similar role, in the sense that they are used for sharing common code between
platforms, but the difference is that PCL projects do compile to a separate assembly.
The benefit of using Shared projects is that you can still embed platform-specific
code (e.g. Android- or iOS-specific APIs) within a shared project, controlled by C# preprocessor constants.
Whereas in PCL projects you are limited to a platform-independent,
greatest-common-denominator subset of the .NET framework. The benefit of PCL projects is that
you are not obliged to share source code, but can provide PCL assemblies in binary format - typically via the .NET Nuget package manager.
The CocosSharp framework itself is for instance provided as a PCL assembly by Xamarin, and you can find it on Nuget. Btw, CocosSharp is open source and a fork of Cocos-2d/XNA, and both can run on MonoGame.
In this case I chose to use a Shared project type, because I will be calling our Juce audio library from shared code. As we will see, calling native code from C# requires the P/Invoke mechanism, which is platform-dependent and cannot be used from within a PCL project.
After choosing your start-up project and target device you should be able to compile and run the projects by pressing F5. Here’s a screenshot of the iOS version of the app running in the simulator:
As you can see a it’s a very basic UI. And while it technically uses a gaming UI API, it does not have to act like a game - we can do whatever we like, from a full fledged game to a ‘traditional’ skeuomorphic hardware emulation that is so common in the audio world - perhaps with some tasteful control animation sprinkled on top.
More specifically, it uses a CocosSharp CCMenuItemToggle for enabling/disabling the test tone, and an animated CCSprite for the
rotary knob that selects the frequency. The rotary knob images where created using the fantastic KnobMan.
As our focus is rather C++/C# integration here, we will not explain CocosSharp development itself in much detail though - to learn more please
visit the CocosSharp Wiki.
Juce C++ / Xamarin C# interop
As said the beef of this post is about interop between Juce and Xamarin. The design of this interop is relatively straightforward:
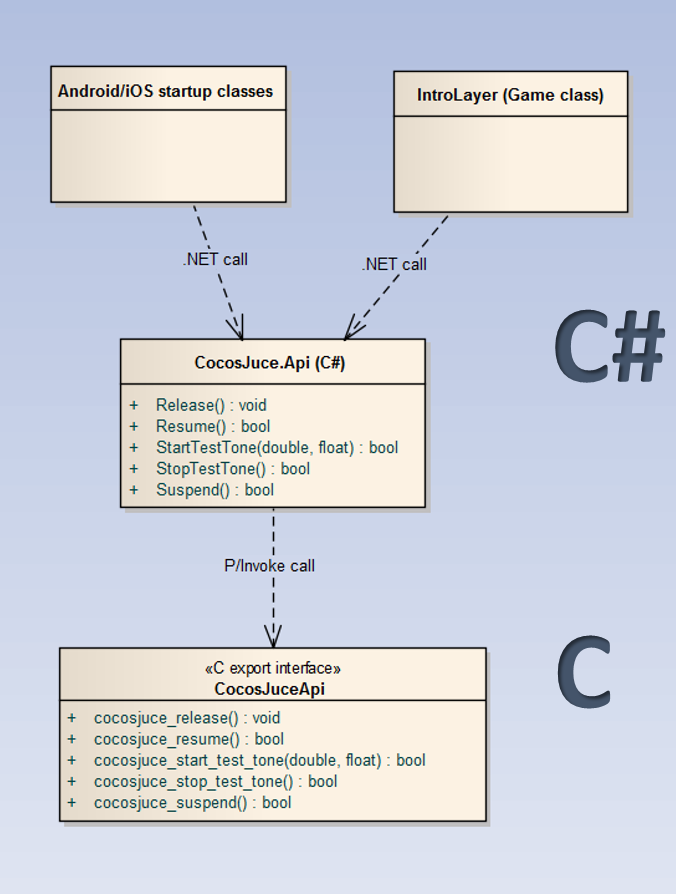
The central part in this design is a C# class called CocosJuce.Api. This class defines the mapping between
a set of static C# methods and their native counterparts, exported by our Juce C++ library (see part 1).
We can choose the C# method names freely - but it’s always recommended to use the naming convention of the platform (being Pascal Casing for .NET).

The mechanism used is called P/Invoke and can be recognized by the usage of the [DllImport] atttribute.
This attribute requires at least two parameters:
| Parameter | Value |
|---|---|
| Library name | Android: "libCocosJuceSharedLib" iOS: "__Internal" |
| Entry point | exported C function name |
On Android we need to specify the name of our shared library, but without a need for the .so extension.
On iOS we need to use the constant string "__Internal", since for iOS Xamarin will figure out the static library name itself.
There are more possible parameters, but we can safely use their defaults for now.
For functions with a boolean return value we require another attribute: [return: MarshalAs(UnmanagedType.I1)].
If we forget this, booleans will be returned with the wrong integer size format, causing unexpected results.
Once we have our interop class in place it’s very straightforward to use it.
For instance, in our shared UI code for the game layer, which sits in the IntroLayer class, we can start a 440Hz test tone with:
CocosJuce.Api.StartTestTone(440.0, 0.8f);
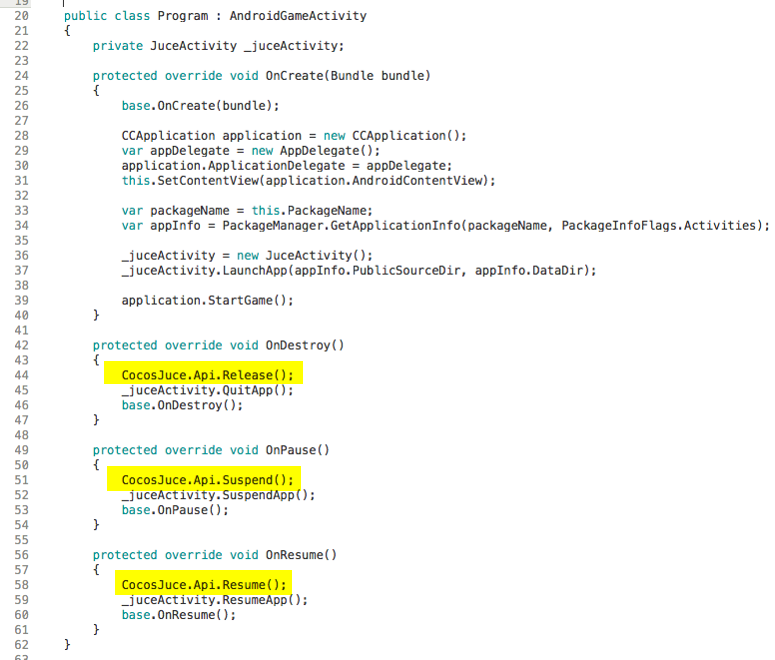
Likewise we’ll call our API’s lifecycle methods methods from our app’s startup classes.
This is slightly different for iOS and Android.
App initialization and lifecycle
iOS
On iOS app lifecycle management happens in the AppDelegate class:
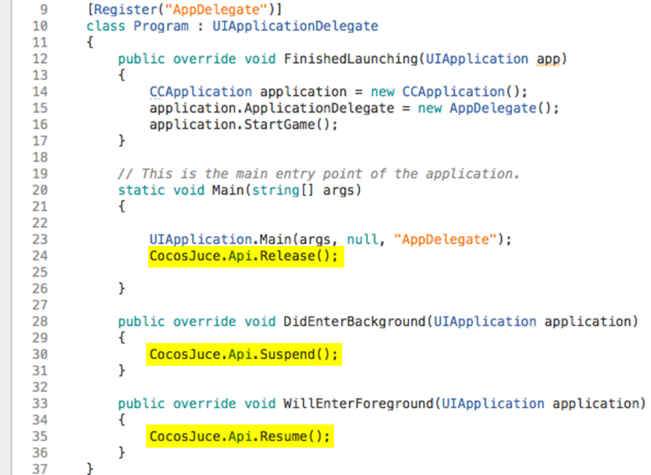
We can conveniently insert additional lifecycle calls to our audio API at appropriate moments. Note that no actual initialization method is needed, because our lib’s initialization is automatic (lazy).
Android
On Android, the lifecycle management happens in a special java class which acts as the launch Activity.
When using CocosSharp this class has to derive from AndroidGameActivity.
Similar to iOS, we’ll call our API’s lifecycle methods at the appropriate places:
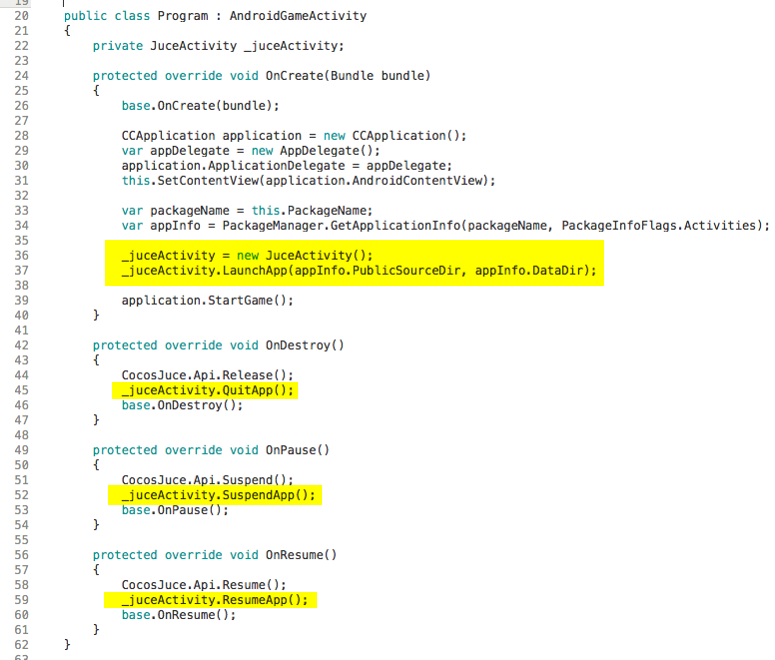
However, on Android we are not done yet. What’s special about Android is that Juce normally requires
its own launch activity class. This is the JuceActivity class that was generated for us by
the IntroJucer when we generated the Juce shared libary project. This JuceActivity class
contains interop code between Java and C++ that Juce will use to initialize the Juce library, for
instance to set up a message loop for event handling.
Now we face a problem though: we already have a launch activity (that should derive from AndroidGameActivity) and which we cannot get rid of when using CocosSharp. So our JuceActivity can neither be a base class for our launch activity, nor can it be the launch activity itself. Yet we need to instantiate a JuceActivity in order to execute some of the initialization code that it contains. One workaround for this catch-22 situation is to have our own launch activity instantiate the JuceActivity and call the launchApp() method on the JuceActivity, which suffices to initialize the Juce library.
Admittedly this is a bit of a hack and it is not guaranteed that this would still support Juce UI functionality. But then again, all we need from Juce here is its non-UI, audio functionality, and that seems to work fine with this approach. In an ideal world (hint hint) the Juce team would adapt the Android support in Juce in such a way that Juce libs do not depend any longer on a Juce launch activity and so this hack wouldn’t be necessary any longer.
More about JuceActivity.java on Android
We mentioned how we instantiated the JuceActivity class from our Android launch activity. However, before we can do that, there’s a few extra things we need to take care of.
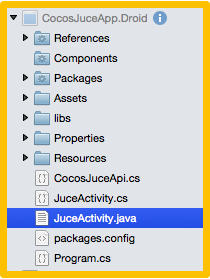
First of all we need to add JuceActivity.java to our solution. Remember that this java class
was generated for us by the IntroJucer.
Look for it in CocosJuce/CocosJuceSharedLib/Builds/Android/src/com/yourcompany/cocosjucesharedlib/JuceActivity.java
You simply copy it your Xamarin Android project folder and include it into the project with Build Action set to AndroidJavaSource:
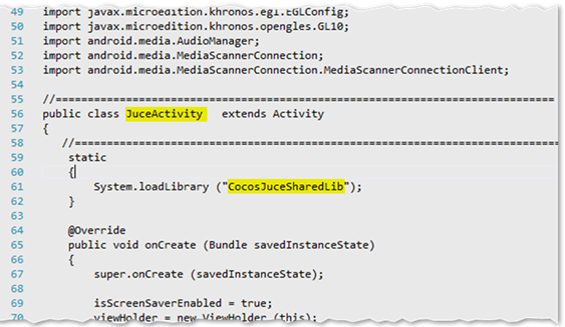
Next we need to make a tiny change to its content, namely change its loadLibrary() call
such that it loads our renamed juce audio library (instead of the default "libjuce_jni")
The last thing to do, is to make sure we can actually instantiate and call this java class
from C# (after all we are still working in Xamarin and our calling class is a C# one that cannot call Java classes directly).
This is done by adding a little C# interop class to our Xamarin Android project, aptly named JuceActivity.cs.
This class has no functionality of its own, other than delegating to its Java namesake version via the JNI mechanism:

Voila, that’s all code we are going to write today. Let’s now proceed to building and linking the app.
Building and linking the app
Xamarin allows to link your app to native libs (obviously, since that’s what this story is about). For this you have to add them to the solution first, and again, this is slightly different on iOS and Android.
iOS
In iOS we copy the two binary static library files (one for the simulator and another for the actual device) to the following folder structure and then include that folder structure in the iOS project:
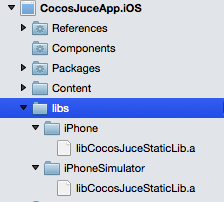
You also have to set each library’s properties to the following values:
| Property | Value |
|---|---|
| Build Action | None |
| Copy To Output Dir | Always copy |
Apart from that iOS requires us to provide some extra information about where to
find these libs and which additional libs or frameworks they depend on. This can
be specified in the iOS project properties dialog, in a field called Additional mtouch arguments:
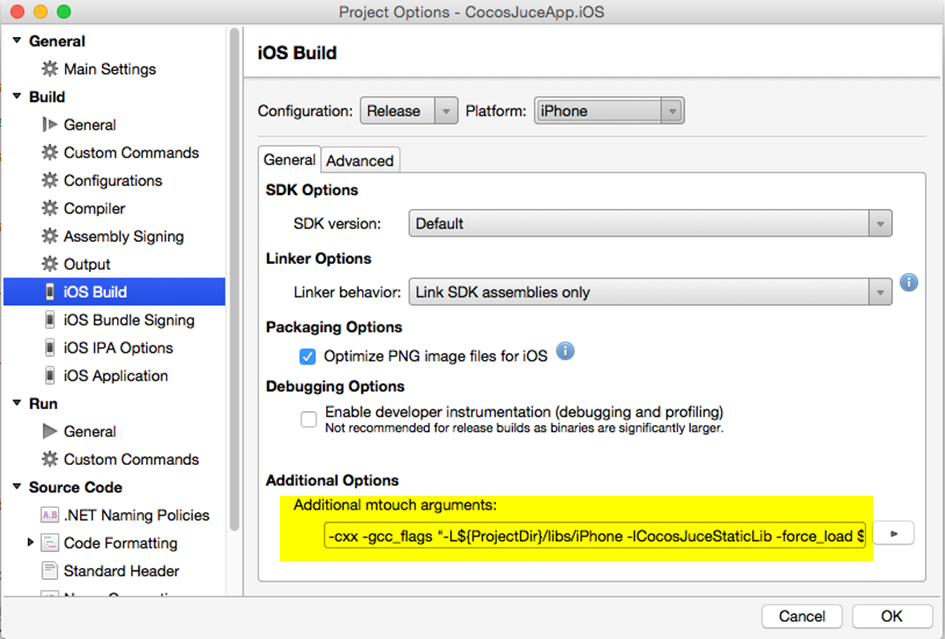
Please note that these arguments will be different for iPhone and IphoneSimulator builds;
iPhoneSimulator Debug/Release
-cxx -gcc_flags "-L${ProjectDir}/libs/iPhoneSimulator -lCocosJuceStaticLib -force_load ${ProjectDir}/libs/iPhoneSimulator/libCocosJuceStaticLib.a -framework CoreText -framework AudioToolbox -framework CoreMidi -framework Accelerate"
iPhone Debug/Release
-cxx -gcc_flags "-L${ProjectDir}/libs/iPhone -lCocosJuceStaticLib -force_load ${ProjectDir}/libs/iPhone/libCocosJuceStaticLib.a -framework CoreText -framework AudioToolbox -framework CoreMidi -framework Accelerate"
Android
On Android things are even simpler. Like with iOS we have to copy the binary library files to a folder structure, but with a different structure this time:
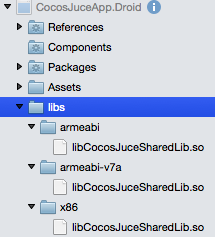
Then set each lib’s properties as follows:
| Property | Value |
|---|---|
| Build Action | AndroidNativeLibrary |
| Copy To Output Dir | Do not copy |
That’s all. No mtouch arguments needed here.
You can now compile and deploy the app as you would any Xamarin app. The binary libraries will be automatically deployed as well in case of Android, or statically linked to the app’s executable in case of iOS.
Wrapping up
By now we have seen the whole process of integrating a Juce C++ audio library in a Xamarin CocosSharp app.
Note to Windows developers:
if you examine the sample code project repository (link at top of this article) then, as a bonus, you’ll find also a Windows version of the CocosSharp UI
in the form of the project CocosJuceApp.WinDX. This is not a mobile app, but a classic .NET Win32 application, with a dependency on DirectX instead of OpenGL.
This project illustrates how the same CocosSharp code can also be used outside of Xamarin-based solutions.
If you are a Windows developer this offers a very quick way to develop or prototype CocosSharp UIs, since the code/build/debug cycle roundtrips are much faster when coding for Windows only.
Once done you can use that same CocosSharp code again in your mobile projects and you should be good to go.
This project demonstrates as well how to consume our Juce audio library from Win32 .NET code. More specifically a Windows build configuration is included in the Introjucer file for the shared libraries, which produces a suitable Win32 dll.
Similarly there is another project, named CocosJuceTestClientCSharp, which demonstrates how to consume the win32 dll version of our audio lib
from a basic good old .NET WinForms application, removing any dependency on CocosSharp.
In Part 3 of this series we’ll talk about a few additional approaches, such as how to consume our Juce audio lib from a non-game UI in Xamarin.